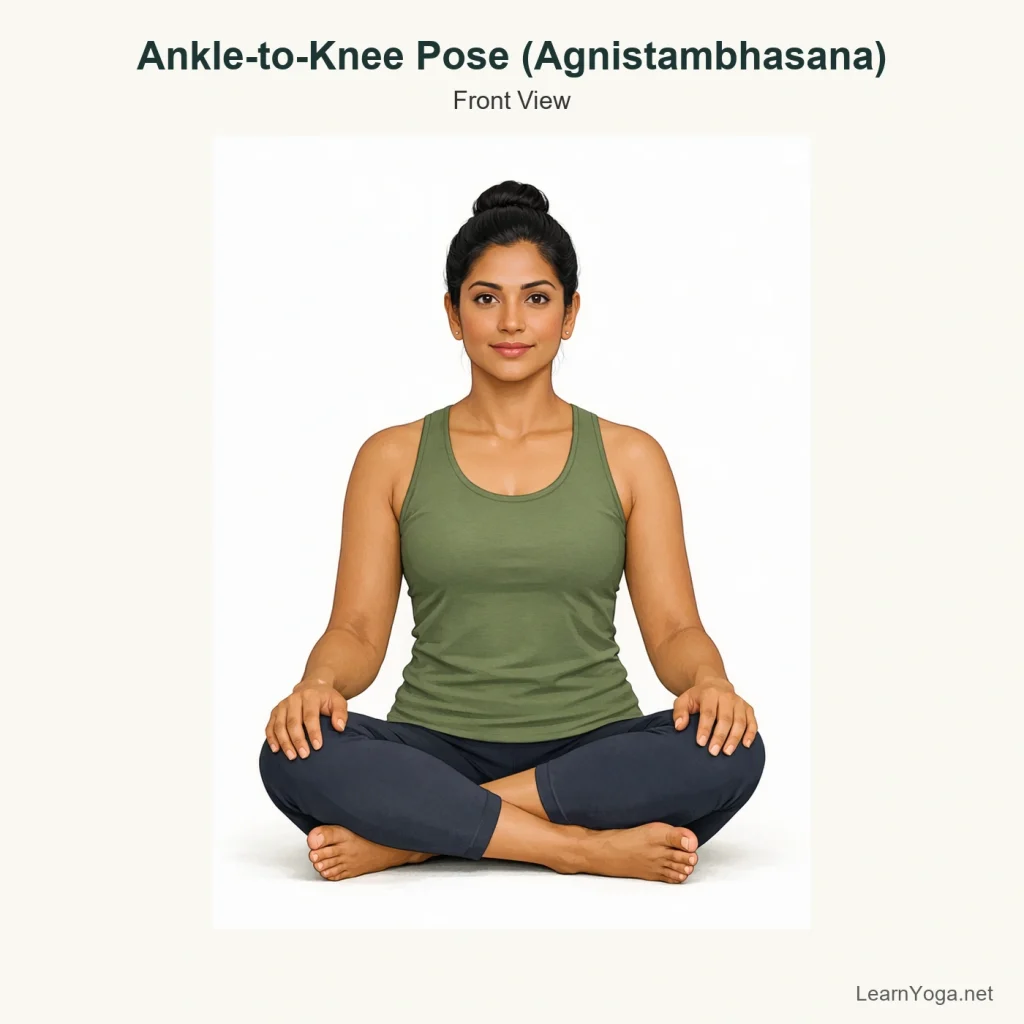
Ankle-to-Knee Pose is a seated hip opener where the shins stack as comfortably as they can. It asks for external rotation in the hips, but the shape does not need to look square to be useful.
This pose works into the outer hips and glutes while also asking you to sit upright with some steadiness through the spine. Many people feel it strongly without needing a deep fold. If the knees lift high or the stacked shape is not available today, props or a simpler alternative usually make the pose much more workable.
How to do Ankle-to-Knee Pose
Sit on the floor in Easy Pose, then bring your left shin forward so it is roughly parallel to the front edge of your mat if that is comfortable.
Place your right shin on top, aiming the right ankle above the left knee and the right knee above the left ankle. Let the shape be approximate rather than forced.
Flex both feet gently so the ankles feel awake and the knees are not left hanging loosely.
Sit evenly on your sitting bones. If the pelvis tips back and your lower back rounds, sit on a folded blanket or block.
Stay upright for a few breaths, lengthening through the crown of the head on each inhale.
If your body allows, walk your hands forward a little on an exhale and hinge from the hips rather than collapsing through the chest.
Keep the jaw, throat and shoulders relaxed while the legs do the work of the pose.
To come out, walk the hands back in, lift the chest, uncross the legs carefully and change sides.
Yogita's tip
If the top shin keeps sliding toward you, place your hands beside the shins and lightly draw the feet away from the pelvis. That small action often helps the legs stack more clearly without pushing on the knees.
Benefits
Gives a focused stretch through the outer hips and glutes.
Can help you practise sitting upright while the hips are in external rotation.
Offers a steady seated shape for slower breathing and quieter practice.
May prepare the hips for other seated poses such as forward folds or twists.
Common mistakes
Forcing the top knee down instead of letting the hips gradually open.
Letting the feet go completely floppy, which can make the knees feel less supported.
Rounding the lower back heavily to chase a deeper fold.
Trying to make both shins perfectly stacked even when the body is not built for that range today.
Make it work for you
Sit on height
Sit on one or more folded blankets or a block so the pelvis can tip forward more easily and the spine can stay upright.
Support under the top knee
Place a block or folded blanket under the top knee if it hangs far from the floor. This reduces the feeling of the leg pulling downward.
Stay upright
Keep the hands behind you or by your hips and remain tall instead of folding forward. This often gives enough sensation in the outer hip already.
Alternatives
Figure Four on the back
Lie down, cross one ankle over the opposite thigh and stay there or draw the legs in gently.
Use this if sitting upright is difficult or if floor sitting makes the hips and back feel strained.
Bound Angle Pose
Sit with the soles of the feet together and knees opening out to the sides, with support under the thighs if needed.
Use this if the stacked-shin shape bothers the knees or feels too intense in the outer hips.
Easy Pose
Sit in a simple cross-legged seat on height and work on an upright spine with relaxed breathing.
Use this if the pose is too strong today or if getting the shins to stack is not practical for your body.
Common variations
Upright Ankle-to-Knee
Stay vertical with the hands beside the hips or slightly behind you, focusing on even sitting bones and steady breath.
Forward-Folding Ankle-to-Knee
From the stacked-shin position, hinge forward a small amount from the hips while keeping length through the front of the body.
Supported Ankle-to-Knee
Use folded blankets under one or both knees, or sit on height, to reduce strain and make the shape more sustainable.
Safety and contraindications
When to avoid or get individual guidance
Use care with current knee irritation or sharp hip pain.
Skip the forward fold if it makes your lower back round and feel strained.
Keep the action mainly in the hips, not by pressing the knees down with the hands.
A gentle flex through both feet can help the knees feel more supported.
If you feel pinching in the knee rather than stretch in the outer hip, come out and choose a simpler variation.
Sharp pain in the knee, hip, or groin during Ankle-to-Knee Pose is a sign to come out and switch to an easier variation. Repeated pain here is worth getting individual guidance on before trying to stack the legs more deeply.
Accessibility and limited mobility
Sitting on a folded blanket, bolster or block often makes this pose more accessible for older adults and for anyone whose pelvis tucks under on the floor.
If getting down to the floor is difficult, a reclined figure-four shape can give a similar hip action with less effort.
If the knees stay much higher than the ankles, do not chase the textbook stack. Work with the version that lets the hips feel engaged without knee strain.
Easier options
Use these related poses when you want a more accessible way to practise a similar movement or prepare for this pose.
No. For many bodies, especially tighter hips, the knees will sit higher and the ankles may not line up exactly. The pose can still be useful as long as the feeling stays mainly in the outer hips rather than the knees.
Why do I feel this more in my knees than my hips?
That usually means the hips are asking for a smaller version. Sit on height, support the top knee, keep both feet gently flexed, and stay upright instead of folding. If the knee still feels pinchy, switch to a reclined figure-four shape.
Should I lean forward in this pose?
Only if the upright version feels steady and your back can stay long. A small hinge is enough. Many people get a clear outer-hip stretch without folding at all.
What if I cannot sit upright without rounding my back?
Lift your seat on folded blankets or a block. That simple change often gives the pelvis room to tip forward so the spine can lengthen more naturally.
Reviewed for yoga instruction
Yogita
Certified Yoga Instructor with 5+ years of Teaching and Consistent Practice